
Congratulations on
Your New Hearing Aids
You've taken an especially important step in becoming a better listener and communicator. This guide explains what to expect and how to care for your Signia Pure Charge&Go AX hearing aids so they keep working their best.
Meet Your Hearing Aid
Your hearing aids are a RIC model — Receiver-in-Canal. The small speaker (the receiver) sits inside your ear canal and connects to the body of the hearing aid, which rests behind your ear, by a thin wire.
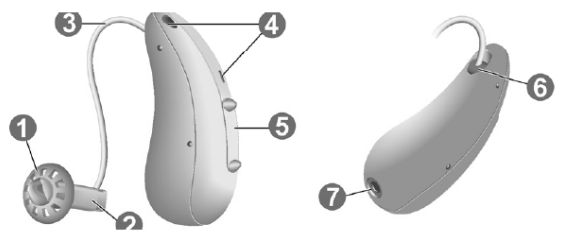
Ear Piece
The soft dome or tip that goes in your ear.
Receiver
The tiny speaker at the end of the wire.
Receiver Cable
The thin wire connecting the receiver to the body.
Microphone Openings
Where the hearing aid picks up sound.
Rocker Switch
Your volume, program and on/off button.
Side Indicator
Red for right, blue for left.
Charging Contacts
The gold points that connect to the charger.
| Standard Ear Pieces | Notes |
|---|---|
| Sleeve 3.0 | Vented, Closed, or Power — your provider marks which type you were fitted with. |
| Eartip 3.0 Open | Open-fit style. |
| Eartip 3.0 Tulip | Tulip-shaped fit. |
| Earmold 3.0 | Custom-made ear molds are also available. |
Which dome size is best?
If it feels loose in your ear, or your hearing aid whistles (sound leaking out), try the next size up or change to a different style.
Right Ear or Left Ear?
Each hearing aid has been fine-tuned for one specific ear. A small colored marker — where the thin wire meets the hearing aid — tells you which is which.
RED = RIGHT
Look for red or the letter R
BLUE = LEFT
Look for blue or the letter L
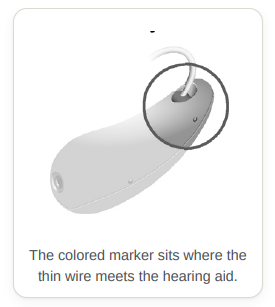
An easy way to remember: Red is Right. Both words start with R.
How to Put Your Hearing Aids On
Take your time. It's often easiest to put the right hearing aid in with your right hand, and the left one with your left hand.
First, check the shape
If you have Sleeves, the bend of the Sleeve should line up with the bend of the receiver cable — the bends should curve the same way.
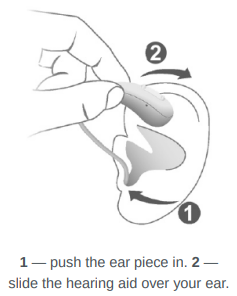
Hold the receiver cable at the bend closest to the ear piece.
Carefully push the ear piece into your ear canal. Twist it slightly until it sits well. Open and close your mouth as you do this — it helps avoid trapped air in the ear canal.
Lift the hearing aid and slide it over the top of your ear so the body rests behind your ear.
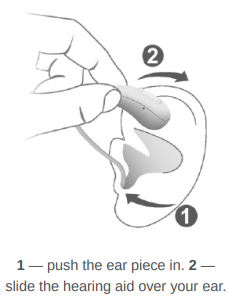
If the ear piece won't go in
Use your other hand to gently pull your earlobe downward. This opens the ear canal and makes the ear piece slide in more easily.
Please be careful
Always wear the receiver cable with an ear piece fully attached. Insert the ear piece carefully and not too deeply into the ear.
Practice in front of a mirror
During your first week, give yourself five minutes a day to practice putting your hearing aids in and taking them out while looking in a mirror. It gets easy quickly.
If you have a retention strand
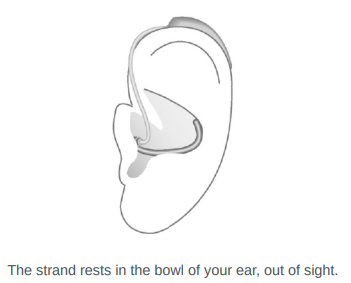
Line up the end of the strand with the flat end of the receiver, then press it toward the receiver until it clicks into place. Once your hearing aid is in, bend the strand and tuck it into the bottom bowl of your ear, where it rests out of sight.
How to Take Them Out
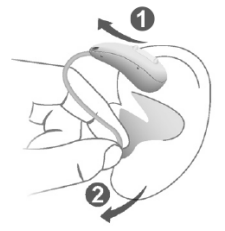
Lift the hearing aid and slide it over the top of your ear.
Grip the receiver in your ear canal with two fingers and pull it carefully out. If you have a custom mold, pull the small removal cord toward the back of your head instead.
Never pull on the thin wire
Do not remove your hearing aid by pulling the receiver cable — grip the receiver itself. In very rare cases an ear piece could stay in your ear when you remove the hearing aid. If this happens, do not dig for it — have it removed by a medical professional.
Clean and dry your hearing aids after you take them out — see Section 9.
Turning On, Volume and Programs
| To Do This | Using the Charger | Using the Button |
|---|---|---|
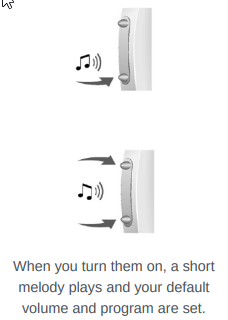
| Turn ON | Take the hearing aids out of the charger. | Press and hold the lower part of the rocker switch until the startup melody plays, then let go while it's still playing. |
| Turn OFF | Place the hearing aids in the charger (must be plugged in). | Press and hold the upper or lower part of the rocker switch for several seconds. A power-down melody plays. |
Changing the volume
Your hearing aids adjust volume automatically. To adjust it yourself: press the upper part of the rocker switch for volume up, the lower part for down. You'll hear a soft beep as it changes, and another at the maximum or minimum.
Changing the hearing program
Press the rocker switch briefly to move to the next program — a soft tone confirms the change. You can also change volume and programs from the Signia app on your phone.
Charging
Your hearing aids have a rechargeable battery built in. There are no small batteries to change.
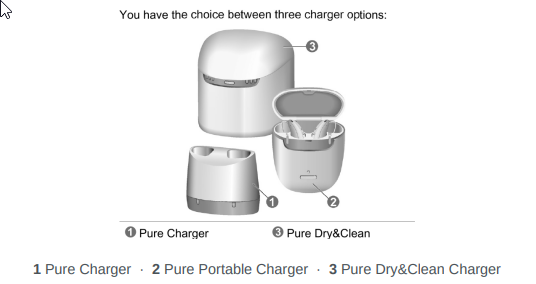
Make sure the charger is plugged into power.
Place your hearing aids in the charger. They turn off and begin charging.
Take them out in the morning. They turn on automatically and play the startup melody.
| Question | Answer |
|---|---|
| How often should I charge? | Every night, even if the battery isn't empty. Charge overnight so you start each day full. |
| How long does a full charge take? | About 4 hours. After just 30 minutes you already have up to 6 hours of use. |
| How will I know it's getting low? | You'll hear an alert signal, repeated every 20 minutes. You then have about 1.5 hours left. |
| What if I forget to charge? | The hearing aids simply switch off. Charge them as soon as you can. |
If you store them away
Hearing aids left uncharged for more than 6 months can be permanently damaged. If you're not using them for a long time, charge them fully first, turn them off, and recharge them at least every few months.
What to Expect the First Few Weeks
Hearing aids are similar to wearing new glasses — it takes a while to adjust. Your brain needs time to relearn sounds it hasn't heard in a while.
Your Own Voice
May sound loud or unnatural at first. Read aloud 10–20 minutes a day to help it sound natural again.
Small Sounds
The fridge, footsteps, paper rustling — sounds you haven't heard in a while may seem loud. This settles down over time.
Go Easy on Loud Places
No loud places the first week. Start with one-on-one conversations, then small groups, then busier places.
The #1 Habit
Wear them at least 6 hours a day — the goal is all your waking hours. Consistent wear is what makes them feel comfortable.
In noisy places: Your hearing aids automatically reduce background noise slightly, and even more when set to your Noisy Environment program.
Whistling and Feedback
Hearing aids are supposed to whistle in some situations — but not all the time.
Whistling that is completely normal
While putting them in or taking them out (this is why they play a melody — to cover that whistle); when something is near the hearing aid (your hand, a hat, a phone); when the volume is too high; or when cupped in your hand — a great way to check if they're on.
| Likely Cause | What to Do |
|---|---|
| Wax or debris | Clean your hearing aid — change the click sleeve or tip and brush the ports. A clean, dry toothbrush works well. |
| Not placed correctly | Check in a mirror that it's seated properly in the canal, or ask a friend/family member to confirm. |
| Wrong size tip | Try a different size or style of tip. Usually a very minor change makes the difference. |
How to Clean Your Hearing Aids
Preventative maintenance is the key to long-lasting hearing aids. Cleaning takes under a minute and quickly becomes part of your routine.
Wipe the hearing aids with a soft, dry tissue or cloth — every day.
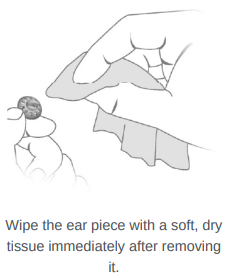
Clean the ear piece right after you remove it, while any wax is still soft. This stops wax from drying hard.
Wipe sweat or moisture off the charging contacts before putting them in the charger. This prevents corrosion.
Put them in the charger or a dehumidifier overnight to dry.
Once a week
For the best sound quality, brush the microphone openings and receiver ports with a clean, dry brush (a soft toothbrush kept just for this works well).
Once a month
Clean wax out of your domes once a month — or any time you notice wax on them.
Never Do These
How to Change a Dome Tip
Replace standard ear pieces about every three months — sooner if you notice cracks, stiffness, discoloration, or wax you can't clean out.
Taking the old one off
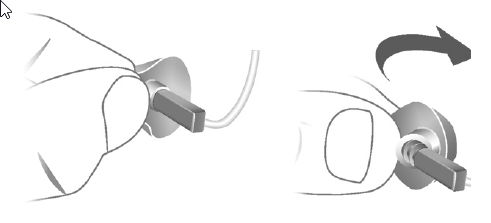
Hold the receiver — the small speaker at the end of the wire — firmly between your thumb and finger.
Grip the old dome and pull it straight off, twisting gently if needed. Be careful not to pull on the receiver cable.
Putting the new one on
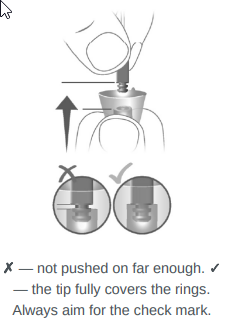
Line the new dome up straight over the end of the receiver.
Push it on firmly until it fully covers the retention rings on the receiver. This is the part people most often get wrong.
Give it a gentle tug to check it's on firmly. It should not slide off.
Why a firm fit matters
If the dome is not fully attached it can come loose in your ear. Always check the fit before putting the hearing aid in.
Everyday Care Rules
| Rule | Why It Matters |
|---|---|
| Wear them at least 6 hours a day | Consistent wear is what makes them feel comfortable and natural. |
| Dehumidify every day | Avoids moisture and corrosion, which cause microphone drift and repairs. |
| Practice putting them on | Five minutes a day in front of a mirror during your first week. |
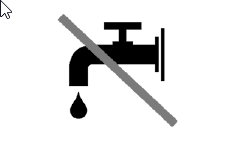
| Hearing aids and water don't mix | Don't keep them in the bathroom or wear them in steamy areas. If caught in rain or shower, dehumidify immediately. |
| Keep away from pets | Use your case whenever you're not wearing them. Dogs are drawn to them. |
| Hair products go on first | Apply hair spray and other products before putting your hearing aids on — it clogs the microphones. |
| Clean often | Wax out of the domes once a month, a fuller clean once a week. |
| Keep away from heat | Never near fire, a microwave, an oven, or in direct sunlight in a hot car. |
Your provider can help too
Your Hearing Care Professional can perform a thorough professional cleaning, and can replace custom ear pieces and wax filters as needed. Ask about a maintenance schedule that fits how you use your hearing aids.
Using Your Phone
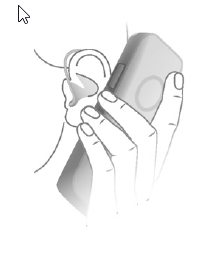
Holding the phone to your ear
Hold the phone slightly above your ear so the hearing aid microphone and phone speaker line up. Turn the phone slightly so your ear is not completely covered.
Streaming calls and music
Your hearing aids use Bluetooth, so calls and music can play directly into them from an iPhone, or from an Android phone that supports Audio Streaming for Hearing Aids (ASHA).
Let Tech Support do the pairing with you
Download the Signia app from the App Store (iPhone) or Google Play (Android), then call (800) 350-6093. They will stay on the line and walk you through connecting your hearing aids — much easier than doing it alone, and exactly what the line is there for.
If you'd like to try it yourself first: to put your hearing aids into pairing mode, turn them off and then back on again. They stay ready to pair for about three minutes.
On an iPhone
Go to Settings → Accessibility → Hearing Devices.
Turn your hearing aids on. Your name will appear on screen marked "Not Paired."
Tap it, then tap Pair in the box that appears. If you have two hearing aids, tap Pair again on the second box.
On an Android Phone
Go to Settings → Connections → Bluetooth (on some phones, Settings → Connected devices).
Turn your hearing aids on, then tap Scan or Pair new device.
Wait for both hearing aids to appear, tap one, and confirm by tapping Pair. If the second doesn't join within about 10 seconds, repeat for it.
Then open the Signia app and allow it to use Bluetooth and send notifications when it asks — the app connects separately from the phone-call connection, so follow its on-screen instructions too.
On an airplane
Bluetooth use may be restricted, especially during take-off and landing. You can switch Bluetooth off in your hearing aids using the Signia app.
Important Safety Information
Your hearing aids contain a rechargeable lithium-ion battery, built in permanently. Incorrect use can cause the battery to burst — a risk of injury, fire or explosion.
Please Follow These Rules
If any of these situations come up, return your device to your Hearing Care Professional. For more information, see the safety manual supplied with your device.
These hearing aids are not intended for children under 3 years of age, or for anyone with a developmental age under 3.
Quick Troubleshooting
| What's Happening | Try This First |
|---|---|
| No sound at all | Check they're charged and turned on. Cup one in your hand — if it whistles, it's on. Check the dome isn't blocked with wax and is fully attached. |
| Sound is weak or muffled | Wax is the usual cause. Clean the dome and brush the receiver port. If it doesn't improve, the wax filter may need replacing. |
| Whistling all the time | Reseat the hearing aid in your ear, check the dome size, and check for wax. See Section 8. |
| Won't charge | Make sure the charger is plugged in, and wipe the charging contacts on the hearing aids and in the charger with a dry cloth. |
| Battery dies too fast | Heavy Bluetooth streaming uses more power. Make sure you're charging fully overnight. |
| Phone won't connect | Turn the hearing aids off and on to restart pairing mode, then call Tech Support at (800) 350-6093. |
| Your own voice sounds odd | Normal in the first weeks. Wear them daily and read aloud 10–20 minutes a day. See Section 7. |
Hearing Aid
Tech Support Line
Not just pairing — call for app help, charger troubleshooting, error messages, connectivity issues, or general handling questions. Before you call, have your hearing aid model and phone type handy.
Hearing Benefit Services
A trusted remote hearing care provider. Top-brand Signia hearing aids delivered and fitted remotely — serving all 50 states since 2016.

Resources
Financing Options Signia FAQ Bluetooth Pairing Guide Hearing Aid Guide Pricing & Packages Cleaning Guide TestimonialsContact Us
© Hearing Benefit Services. All Rights Reserved. Serving all 50 states remotely.
Disclaimer: Content on this website is for informational purposes only and does not constitute medical advice. Consult a licensed hearing specialist for diagnosis and treatment recommendations.